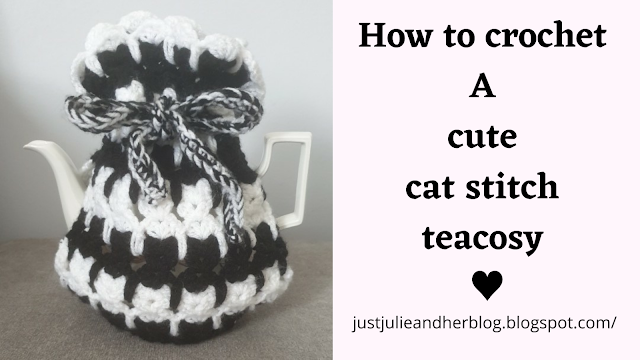
Hey guys, I'm super partial to a nice warm cup of tea, and there's nothing nicer than having a lovely teapot to accompany it especially one with this super cute cosy. It not only looks good but it also goes with the crazy cat lady theme I have going on, seriously I have blankets, mug cosys, dishcloths, and much more I'm obsessed. It's so easy to make, and it looks a lot harder than it is.
So in today's post, I'm going to share the pattern with all of you. Before we get started I just want to say that even though I'm from England, I use the US terminology because I taught myself on YouTube and it's all I know, I could write the English format, but it just confuses me.
Just in case you use the British terms the stitches used in this pattern are:
Double crochet (DC) which is a Treble crochet in the UK
Single crochet (SC)
Slip stitch and chains.
For this project, I used white and black yarn.
I also used a 4.5 mm crochet hook
Scissors and obviously a teapot
We will start by chaining a multiple of 5 plus 5 with your white yarn, so what I did was chain a long length until it fit the teapot from the handle to the spout, make sure it's not too baggy or your tea may become cold and nobody likes a cold cup of tea.
I chained 30 and added 5 extra chains and this counts as your first double crochet.
Row 1: Skip 4 into the 5th stitch place 1dc, skip 4 into the 5th stitch place 2 DCS, chain 1, place another 2 DCS into the same stitch, skip 4 into 5th place another 2dcs, chain 1, and add another 2 DCS repeat until the last stitch and in this one you will place 2 DCS.
These are called fan stitches or shells.
Row 2: Chain 2 and turn, dc into the second stitch along, now between the fan stitch from the previous row, right in the middle place another fan stitch so 2 DCS, chain 1 another 2 DCS, continue placing fan stitches into each previous fan stitch until you come to the last stitch and place 1dc, go into the top of the chain from the previous row now take your black yarn and make your last dc.
Row 3: Chain 2 and turn, dc into the next stitch along. Now we need to make the paws so if you look at this picture below where my hook is you're going to yarn over, go straight down into the bottom hole right at the bottom and pull up a loop, now yarn over again go back into the hole and pull up, now yarn over one more time and go through all 5 loops on your hook and chain 1 to secure it.
In the fan stitch from the previous row make another fan so 2 DCS, chain 1, 2 DCS then make another paw so yarn over go straight down into the hole pull up a loop, yarn over again go into the hole, Pull up another loop then yarn over one more time and go through all 5 loops and chain one. Then go straight into the fan stitch place your 2 DCS, chain 1, 2 DCS, make your paw and repeat until the last stitch where you will place 1 dc (you may have to move the paw aside so you can find it) and put another dc in the top of the chain from the previous row. Don't worry if it's curling a little it will straighten out as it gets larger.
Rows 4 and 5: will be fan rows so chain 2, 1 dc in the second stitch, now go in between fans and place another fan so 2 DCS, chain 1, 2 dcs repeat until the end remember the last stitch is just 1 dc, chain 2 then repeat the fan row.
Row 6: will be the paw row so chain 2, and repeat row 3, at the end 1 dc in the last stitch, then 1 DC in the top of the chain. Chain 2 it should now be looking like this.
The next two rows will be fans, so repeat this until you reach your desired length, I added a few extra rows at the top roughly around 2 or 3 inches, so once you put in the tie it doesn't all scrunch up.
So carry on creating 1 paw row, and 2 fan rows.
You need to make 2 of these. and once you're finished, they should look like this.
Now you need to create your tie, so I created a black and white tie by using the black and white strands together. So I chained 100, you chain however long you would like this. Then SC in the second chain from hook all the way to the very end then tie off.
With the two pieces you made, you need to sew them together but you only have to sew a little at the bottom of each, so place them together and sew one corner and the other corner together, then repeat on the opposite side so just the two corners
Next, you need to weave the tie in through one of the gaps and out of the next, all the way around until the two ends meet at the front, then pull ends tight and you can either leave them dangling or tie a nice bow. Place your teapot in the tea cosy and that's it your cute cat tea cosy is now complete.
These would make a great gift either for yourself or someone special, so get your crochet on. You can share your completed tea cosy with me on Twitter, I'd love to see your creations my username is @JulieOonline
Happy crocheting everybody. xoxo


No comments:
Post a Comment